Thursday, August 29, 2013

Holiday Catalogue ESAD Blog Hop

Welcome to the ESAD blog hop for the holiday catalogue - it is a DOOZY!!!
You are going to LOVE what everyone has come up with to share with you.


You may have started here - in which case, that is fine! It is a circular hop, so just follow it round til you get back here :)
Or you might have come from Jenny Hayward's blog - isn't she talented???

So.. on to my projects.

As soon as I saw the Seasons of Style Journalling Tags, I thought.... hmm quick and easy cards!! no stamping needed :)


This also uses the new washi tape - super cute!!!


Love the bling on this one!! :)

There are 35 printed tags in this set - so plenty to make your entire stack of Christmas cards for the season!
All for only $10.95!


Ok.... on now to Christie's blog - she has also used the tags - but in a VERY different way!
Enjoy!!

What is ESAD?

ESAD stands for "Extra Special Australasian Demonstrators" and it is an on-line facebook group just for Australian and New Zealand Stampin' Up! demonstrators.

We love what we do & love to share with our customers, friends, and wonderful blog visitors. We also share what we love in our ESAD Demonstrator community, through swaps, challenges, sharing knowledge,
ideas & friendship, and we're always there to help and support each other.

So if you are a Stampin' Up! demonstrator located in Australia or New Zealand, then please feel free to leave me a comment with your Email address and I'll contact you with information on how to join our wonderful group.


Tuesday, July 2, 2013

ESAD 2013-2014 catalogue Blog Hop

Wow - seems all my titles lately have "blog hop" in them! I MUST post here as well as on my facebook page!

Anyway...... this ESAD Blog Hop is to showcase all the gorgeous things in the brand new shiny 2013 - 2014 annual Stampin' Up! catalogue.


Who or what is ESAD?? ESAD stands for "Extra Special Australasian Demonstrators" and it is an online group just for Australian and New Zealand Stampin' Up! demonstrators.We love what we do, and love to share with our customers, friends and wonderful blog visitors. We also share what we love in our ESAD demonstrator community through swaps, challenges, sharing knowledge, ideas and friendship, and we are always there to help and support each other. So, if you are a Stampin' Up! demonstrator, located in Australia or New Zealand then please leave me a comment with your email address and I'll contact you with information on how to join our wonderful group :)

If you joined me from Christie's blog, welcome :)

The product I chose to focus on was the Epic Day Designer Series Paper (DSP) - it is not normally my type of paper - it's very bright, but with vintage sponging and distressing - two things I tend to stay away from!! But I don't know what it is about this paper that I just LOVE!! I do like co-ordination, so the fact that there is a whole suite of products to go with the DSP might have something to do with it!
My first project is something I did after our UnConvention in May. I couldn't afford to go to real convention, so a group of us got together on facebook and did some challenges and had some chats and generally had a lot of fun! But it got us thinking - do we want to be on facebook next year, or in Melbourne at the real thing?? SO - I went out and bought a cheapie money tin - you know the ones you need a tin opener to get your money out?? (Here is the before pic - isn't it gorgeous??!!)


 - so I covered it using the Epic Day DSP, (this is the muted page with lots of empowering words!) and decorated it using the washi tape, and the designer stickers. There are some great sayings on those stickers that fit right in with saving! "Stockpile" "Squirrel Away" "Stash" - plus this quote:


It says "dream what you want to dream, go where you want to go, be what you want to be"
I also used the new rotary stamp to stamp the date on one of the stickers - just to remind me when this needs to be full by!!

And here is the finished tin:


MUCH better :)

And on a totally different brightness scale - here is a scrapbook page I made using the brightest pieces of DSP I could stand - but I wanted to use the new single stamp "sunshine" - and so the bright colours really fit with that :)

(I totally CASEd this layout from Carol Payne - it is a progressive page - starting with a 6x6, then A4, then finally 12x12)

(please excuse my photos! My house is very dark, and taking these was really tricky! I will give it another go, and see if I can replace the pictures!)

My next project is a sampler for my stamp room wall - it's made to fit a 6x8 frame, with 6 "mini canvases" using the DSP and co-ordinating product. Love the washi tape! I stuck it to a piece of pool party cardstock, and then punched out little flowers for the middle of the rosettes. Too cute!


Finally - a version of these DSP paperclips appear in the new catalogue - but I changed them a bit. I had been playing round with the oval punch bows for a couple of projects for my catalogue launch, and wondered about putting them on top of a paperclip as a bookmark - well it totally worked!
I LOVE these things!! There is a tutorial here for the oval punch faux bow - too easy!! for the paperclip, swap the button for a thin strip round the middle, and thread it through the paperclip before gluing it to the back of the bow :) (make sense???)

These are SOOOO addicting, and so easy to make!! I DARE YOU to try and make only one ;)

Ok.... that is me - although I still have tons of stuff I wanna do with this DSP! I'll save it for another day, and maybe post before the next blog hop!!

Now it's time to head on over to Tanya's page - I nearly died when I realised who I was next to!! When my money tin is full, and I make it to convention next year, I will TOTALLY be stalking this lady!! :) Enjoy her gorgeous projects!

Sunday, April 7, 2013

ESAD Seasonal Catalogue Blog Hop


I have to admit to not being totally enamoured with this seasonal catalogue at first glance - but then I saw all the AMAZING things people were creating with the products, and my wish list went from about 3 items - to about 30!! Hopefully, this blog hop will do just the same to you!!

We have 24 super talented Stampin' Up! demonstrators from around Australia and New Zealand - I'm not sure I can include myself as super talented - I always feel so much pressure when I see who else was signing up to do the hop! Hopefully I can live up to my own hype!!


What is ESAD?

ESAD stands for "Extra Special Australasian Demonstrators" and it is an on-line group just for Australian and New Zealand Stampin' Up! demonstrators.

We so love what we do and not only do we love to share it with our customers, friends, and wonderful blog visitors, but we share our love for what we do with each other as demonstrators. We run swaps, challenges, tutorials, product know-how, and cyberstamps, and we are always there to help and support each other when it is needed.

So if you are a Stampin' Up! demonstrator located in Australia or New Zealand, then please feel free to click here to join our wonderful group.


So.... anyway... you possibly came from the uber talented Sharlene Meyer's blog - and her gorgeous creation using the Tea for Two suite for the new My Digital Studio. If not, stress not! It's a circular hop - just follow the links and you'll find your way back there eventually!

Ok... on to my projects. I chose the Dress Up Framelits for my product - I just love them. There are so many gorgeous ideas with this set. There is a matching stamp set, but I wanted to have a play with the framelits using DSP and other ways to make them pretty!
So, I googled, and pinterested, and generally wasted a LOT of time, and then played with a HEAP of different ideas - and then I put them all to one side and went with a very basic set up for each of my projects!

The framelits come with three shapes - a mannequin dress form, a cap sleeve dress and a strappy dress. I wanted to showcase the two different types of dress - and how you can alter each dress to get some really cute options. The frame above shows the cap sleeved dress, altered from left to right - cutting the sleeves down to make straps, making it longer, the original - with a ribbon belt added, a longer version with a rounded neck, then the final one with a cardigan over the dress. 
I love how the simple act of using the 3/4 inch circle punch to scoop the neckline changes the look of the long dress. (I'm so sorry for the photos - the glass from the frame made it so hard to take a decent photo!)

Here's a close up of the un-altered dress - although I cheated a bit - and it IS altered!! I cut the top and bottom out of a piece of Print Poetry DSP, and placed it so the pattern was in the best place - then covered the join with the Midnight Muse ribbon - but the shape is unchanged, and THAT was my point!

This frame shows the strappy dress - altered in much more obvious ways than the cap sleeve. How CUTE are those shorts in the middle?? I saw that idea on Patty Bennett's blog - and thought I have to do that! Left to right, the alterations are: the plain strappy dress with a cropped cap sleeve cardi over the top, the original, shorts made using the floral frames framelits, strapless, and a plain strappy dress, with a shorter strappy dress over the top - with the neckline cut out using the floral frames framelit. Pretty!!
Here's those shorts up close - LOVE!!

Once I had played with altering the dresses, I wanted to do a frame as a thank you for a friend of mine who has been a HUGE help to me latel, - and she is totally into dresses and clothes and so this was the perfect gift for her!! So I chose the summer smooches DSP, and cut out some different dresses, and lined them up together.
I saw lots of dresses on the net with additions, and bling and belts and all sorts - but these patterns were just so busy and beautiful on their own, that everything I tried just ruined them! I am in love with that green chevron pattern dress!! How cute would that be in real size???

Finally...... I have another friend who has taken on a big challenge in her life lately, and I wanted to do a little something for her. I saw the Feel Goods stamp set - and the wording just spoke to me - so I created a little piece of art for her, using the dress framelits, and the blackboard technique - I LOVE this technique - I don't think it is possible to get it wrong!!


I know some people use embossing powder, but I prefer using just craft ink - I think it looks more authentically dusty!
And here are the other two cards in the little set


Wow - if you are still with me - good job!! Otherwise, you may have just scrolled down to find out where to go next!! Well, it's here to Monique Fielder's gorgeous project using the Just Thinking Stamp Set.
Thanks for stopping by!!

Sunday, January 27, 2013

ESAD SAB 2013 Blog Hop


Welcome to 2013 - what a great year so far!


Have you had a chance to check out the Sale-a-Bration catalogue from Stampin' Up! yet? If not, you are definitely in the right place! You are smack bang in the middle of the ESAD SAB blog hop for 2013 - so feast your eyes on the goodies we have all created for you, using the gorgeous products you can earn for FREE with a qualifying order. See something you like? Contact your local demonstrator, coz this stuff is only available for a limited time!


What is ESAD?

ESAD stands for "Extra Special Australasian Demonstrators" and it is an on-line group just for Australian and New Zealand Stampin' Up! demonstrators.

We so love what we do and not only do we love to share it with our customers, friends, and wonderful blog visitors, but we share our love for what we do with each other as demonstrators. We run swaps, challenges, tutorials, product know-how, and cyberstamps, and we are always there to help and support each other when it is needed.

So if you are a Stampin' Up! demonstrator located in Australia or New Zealand, then please feel free to click here to join our wonderful group.


Ok.... on to the hop..... this is a circular hop, so you can start anywhere and follow it all the way round. Maybe you started here, or perhaps you just dropped in from Rochelle's scrummy page (isn't she talented?? I love her stuff!!) Either way - here is my project.


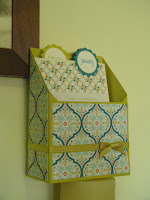
I pinned this delightful (and rather bright!!) idea from Erika Cerwin's blog. I wanted something to organise my cards this year (one of my goals for 2013 is to get more organised - another is to send more cards! - so this idea kills two birds with one stone.) Anyway..... here is my take on it using the Sycamore Street DSP - free with a qualifying order.


I made the box, using Summer Starfruit card stock and covered it with the DSP. Then I had a dilemma - do I sort my cards by month (list everyone with an event that month, make the cards and store them behind the correct month) or by event (the dividers would say "birthday", "anniversary" "thanks" etc etc)? I think I will make one of those next, but for this one, I went with the months of the year.


I printed them out on the computer using the RGB colours that match the SU! colours.


And just to get my organising started - I also made two cards to put in the box. I did CASE these cards, but they were CASEd from cards I had that I had CASEd previously, (that's a LOT of CASE's lol) so unfortunately I cannot remember where I got the ideas from :( If it's you - thanks! I love the simple but effective ways to show off the beautiful DSP.


OK...... that's me - time to hop along to the next stop - the uber-talented Andrea.

Enjoy!

Wednesday, October 17, 2012

and the last lot.....

 Kate Russell
 Alisha Watson
Olivia Ingle

I also got a postcard from Sayerah Deasey - a demo who was holidaying in Paris! PARIS! and she thought to take time out and remember me :) I love Stampin' Up! and all the friends I have met through this awesome company! I think my birthday is well and truly over.... but how lucky was I??

Monday, October 15, 2012

a few late arrivals

The even better thing about the ESAD birthday fairies is that - just because your birthday has been, doesn't mean the cards will stop! We are all busy with different things going on, so cards arrive whenever people have time to get them in the mail! Which means - extra long birthday wishes!
 Isn't this an amazing creation?? this was made by Rochelle Blok - I love the clouds. I must have a go at that technique. She makes it look so easy :)
 Kathy McInnes
Pauline Bennetts

Saturday, October 13, 2012

and they're still coming.....

Sarah Tidey - that little bird tag swings freely - how cute is that??

This one isn't an ESAD card at all - this is from one of my friends/colleagues/customers who is WAY more talented than I am! I copy most of my ideas - she comes up with hers on her own. Thanks Helen :)